Saturday, February 25, 2012

Building the form for the arch

Once I had cut the catenary curve into two identical pieces of plywood, I started building the form for the arch my connecting the two pieces together with a series of wooden battons (70x30mm Pine).


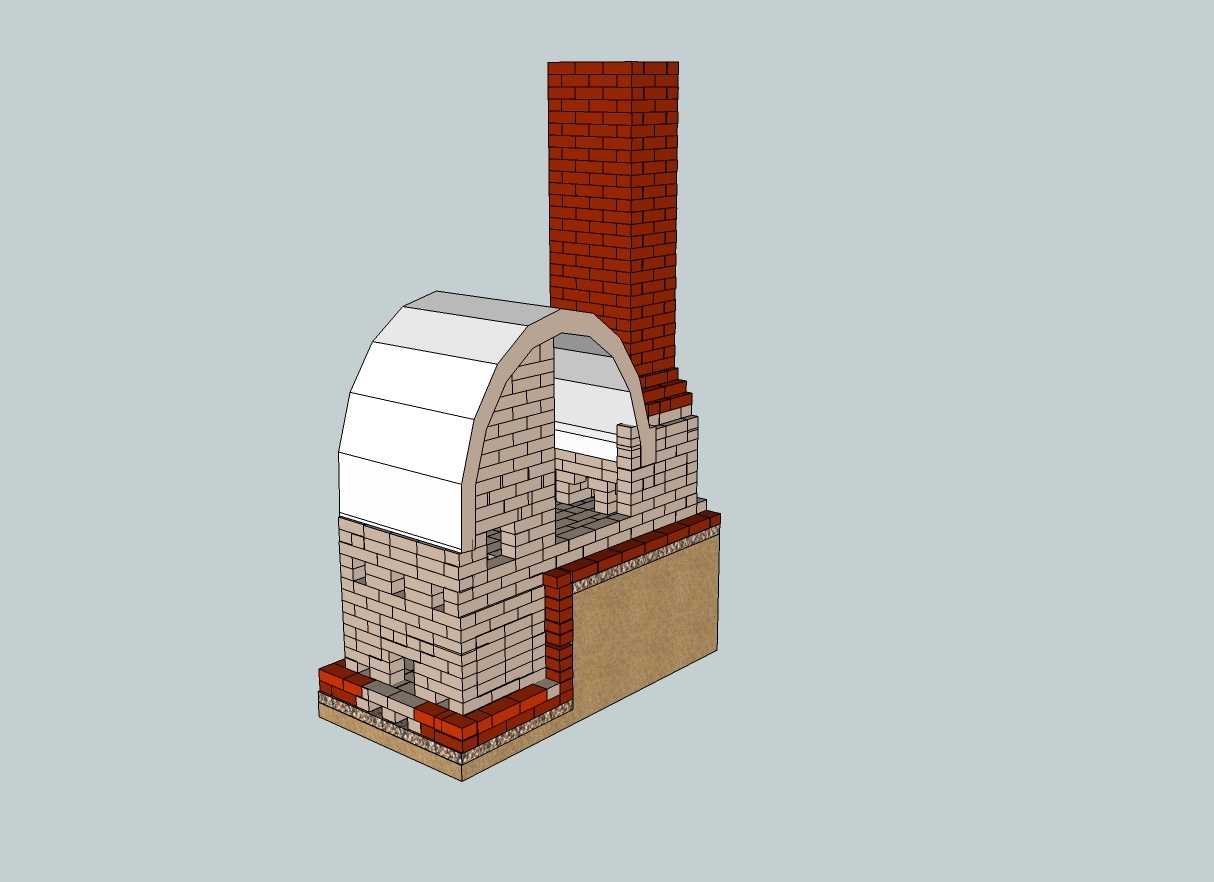
Once the battons were in place I attached a thin sheet (3mm) of ply over the top of the frame. The finished form will be used to hold up the brick arch while it is being constructed. The form will be taken out, of the kiln, once the arch is completed.

As I will be transporting the form from my home to 'Spring Creek' some 375kms away I have made sure it fits neatly in a trailer.

Tuesday, February 21, 2012

Calculating the number of arch bricks needed

After I had drawn the catenary curve on a large sheet of plywood. I cut it out using a band saw and used it to calculate the number of straight and arch bricks needed. I used the spare bricks the ANU ceramics workshop had on hand to see what was the right combination of bricks, to fit the curve, before I ordered my own bricks.

Friday, February 17, 2012

Building the Spring Creek Kiln: Calculating the arch

So that I could  construct the arch of the Spring Creek Kiln easily I decided the arch would follow an inverted catenary curve. Kilns of this type are commonly known as catenary arch kilns. To plot the curve I used:
  • a large sheet of plywood
  • two nails
  • a chain
  • a can of spray paint
I suspended the chain between two points and adjusted the length until I got the desired depth in the curve (or once inverted, the height of the arch). I then sprayed the chain with  paint so I could mark the curve.
Hanging the chain between two nails to create a catenary curve.

Thursday, February 16, 2012

Building the Spring Creek Kiln: The Materials

I planned to dig the firebox into the slope of the site. The foundation for the kiln would be the heavy clay soil with a generous layer of sand\gravel on it. We collected the sand\gravel (predominately quartz) from the creek.


Moving the gravel from the creek to the kiln site
I ordered fire bricks from Sydney and got them delivered to Parkes. We then moved the 3 tonne of bricks to the farm in several loads. I would be using a 42% alumina dense firebrick for the lining of the chamber, firebox and base of the chimney. The bricks will be laid with a thin layer of mortar made up of 50% fireclay and 50% sand. The rest of the construction will be what ever I can find or what ever will do including local rocks and local clay.


My wife Katrina and I stacking the first load of fire bricks

Monday, February 13, 2012

Building the Spring Creek Kiln: The Design

Once I had the kiln site selected I started to plan and design the kiln to suit. I didn't want to transport too much to the location so I planned to use materials around the farm as much as possible. As long as I could:
  • Build it by myself
  • Fire the kiln by myself using timber found on the farm
  • Get the kiln to cone 10
  • Get ash deposits on the work
Because I was happy with the work I had been getting out of the ground hog style kiln that Fred Olsen built at Strathnairn I borrowed his book The Kiln Book and applied many of the design priciples he advocates in it. I also used Handbook for Australian Potters by Janet DeBoos, Stephen Harrison and Leonard Smith to guide me in the selection of construction materials.

The picture below shows the internal lining of the kiln and chimney which will be made predominately out of solid red bricks found on the farm.

2011 Original Spring Creek kiln design

Saturday, February 11, 2012

Building the Spring Creek Kiln: The Site

After firing my work in the ground hog style Olsen kiln at Strathnairn in the ACT. I decided I would attempt to build a wood kiln on location and fire my work in it using wood available on the farm to complement my project. At this stage I didn't have a design or plan, instead I selected the site first. As the creek that runs through the farm floods I needed something on higher ground. I selected a spot which was up from the house and on a slight slope.


late 2011 selecting Kiln site
The soil on the site is quite heavy and contains a lot of clay. As I plan to minimise the materials I transport to the location and use a range of available materials, I saw this as an advantage. I got my father to clear the site with the tractor.


late 2011 clearing the kiln site

Wednesday, February 8, 2012

Wood Firing #2 at Strathnairn: The Results

Despite many of my pots falling over due to either:
  • Incorrect wadding technique
  • Narrow bases or thrown\turned too thin at the base which encouraged slumping
  • Or the Spring Creek clay having too much iron\flux in it causing slumping and imbalance.
I did get some results I was pleased with.

Next time I will be sure to:
  • Take my time with packing and applying the wadding - so it's right
  • Consider slightly wider bases to improve stability
  • And maybe add a small amount of kaolin (i.e. introduce more alumina) to the Spring Creek Clay body so it is more resilient to the high temperatures (and the relatively longer period of time at high temperatures, when compared to my normal gas firings) of the wood kiln.

Front of kiln after firing. Many of the pots have tipped over (see top right and middle top and bottom).

Surface detail at the top of one pot. Pots lined with black glaze.
Untitled 2011 - glaze with glossy surface

Untitled 2011 - glaze with matt surface due to what I think are unmelted ash deposits

Monday, February 6, 2012

Wood Firing #2 at Strathnairn

 After what I thought were good results from the first Strathnairn wood firing, I organised another firing to take place in October. This time I made vessels made from only the Spring Creek clay and used the same glazes. I did however, alter the way the glazes were sprayed on the pot by overlapping\over spraying the glaze in various places and thicknesses. I tried several different combinations.

The vessels I made this time generally had a narrow base which proved to be a little problematic. I made 20 pots for this group firing but only 12 survived, many fell over due to the narrow base and my incorrect wadding technique. I applied one large wad to stabilise my pots in the pack rather than several smaller ones - next time I will stick with several smaller wads on each pot (e.g. 3 or 5 or 7) to keep them upright during the high temperatures.

Front of kiln packed and ready to fired
Picture of one of my pots tipping over and touching the prop (Brick)

Sunday, February 5, 2012

Wood firing at Strathnairn

In 2011 I participated in two wood firings at 'Strathnairn' in the ACT. As I was keen to learn more about the process of wood firing I put my name down for a firing that Ian Jones was organising. I made a series of pots consisting of the clay from 'Spring Creek' and some recycled stoneware I had on hand, the mix was about 50/50. I used a couple of  glazes that I had developed since 2007 which include local materials and a new creme glaze (made predominately from a  rock I find in the creek). I would normally fire these glazes in gas kiln using reduction up to cone 10 (1300 Celsius approx).


When the clouds roll in , 2011, Spring Creek clay (local stoneware) and cloud glaze (Chun).

The process of splitting wood, packing the kiln, firing and then unpacking the kiln, took place over several weekends. The firing itself took several days. Despite the lengthy process I was pleased with the results - the pots definitely looked different to the gas fired ones. The pot below shows the same glaze on the top of the pot and a black glaze on the bottom which ran and stuck this pot to the shelf. The creme glaze reacted nicely with the ash from the burning wood (also below).

Same glaze fired in the wood kiln (note: different clay body)


Creme glaze with ash deposits, wood fired.


Friday, February 3, 2012

Red Brown Earth

 I grew up on 'Spring Creek' and went to school at Tullamore Central (a small 7 -10 Public School). Even though I don't live there now I still feel connected to it. It has been a major constant in my life. When I was of high school age I enrolled at Parkes High (Public 7-12 School) some 114 kms away. It was here where I received an education that ultimately led me to pursue a life and career off the farm. I was never persuaded not to pursue another career, rather encouraged to find a more profitable pursuit than farming. In an agriculture class at Parkes High I learned that text books referred to the soils of the region as red brown. Now I make ceramic artworks that attempt to reflect the place through; the materials I use, abstract representations of the sky, the earth, weather patterns and other natural cycles experienced while visiting the location.
Lambs August 2007