Monday, February 13, 2012

Building the Spring Creek Kiln: The Design

Once I had the kiln site selected I started to plan and design the kiln to suit. I didn't want to transport too much to the location so I planned to use materials around the farm as much as possible. As long as I could:
  • Build it by myself
  • Fire the kiln by myself using timber found on the farm
  • Get the kiln to cone 10
  • Get ash deposits on the work
Because I was happy with the work I had been getting out of the ground hog style kiln that Fred Olsen built at Strathnairn I borrowed his book The Kiln Book and applied many of the design priciples he advocates in it. I also used Handbook for Australian Potters by Janet DeBoos, Stephen Harrison and Leonard Smith to guide me in the selection of construction materials.

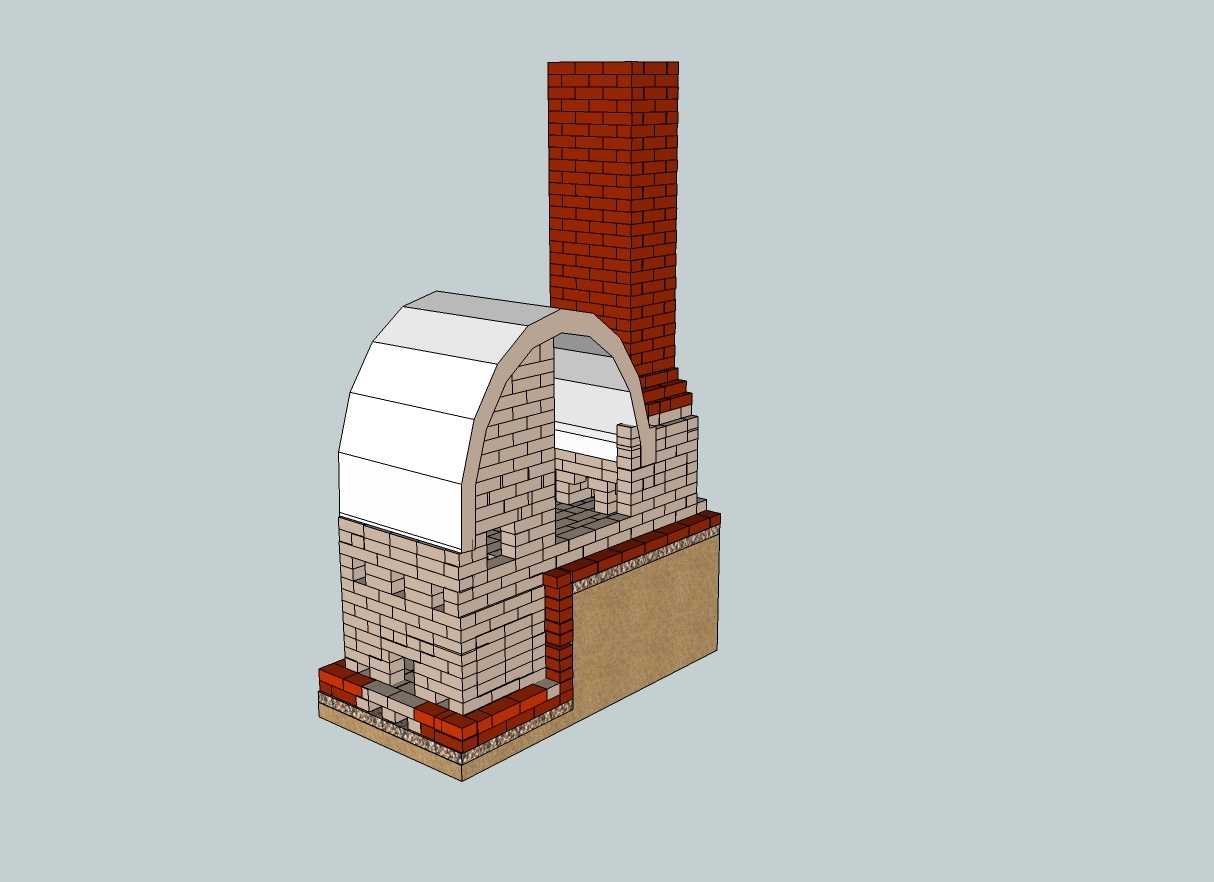
The picture below shows the internal lining of the kiln and chimney which will be made predominately out of solid red bricks found on the farm.

2011 Original Spring Creek kiln design

Saturday, February 11, 2012

Building the Spring Creek Kiln: The Site

After firing my work in the ground hog style Olsen kiln at Strathnairn in the ACT. I decided I would attempt to build a wood kiln on location and fire my work in it using wood available on the farm to complement my project. At this stage I didn't have a design or plan, instead I selected the site first. As the creek that runs through the farm floods I needed something on higher ground. I selected a spot which was up from the house and on a slight slope.


late 2011 selecting Kiln site
The soil on the site is quite heavy and contains a lot of clay. As I plan to minimise the materials I transport to the location and use a range of available materials, I saw this as an advantage. I got my father to clear the site with the tractor.


late 2011 clearing the kiln site

Wednesday, February 8, 2012

Wood Firing #2 at Strathnairn: The Results

Despite many of my pots falling over due to either:
  • Incorrect wadding technique
  • Narrow bases or thrown\turned too thin at the base which encouraged slumping
  • Or the Spring Creek clay having too much iron\flux in it causing slumping and imbalance.
I did get some results I was pleased with.

Next time I will be sure to:
  • Take my time with packing and applying the wadding - so it's right
  • Consider slightly wider bases to improve stability
  • And maybe add a small amount of kaolin (i.e. introduce more alumina) to the Spring Creek Clay body so it is more resilient to the high temperatures (and the relatively longer period of time at high temperatures, when compared to my normal gas firings) of the wood kiln.

Front of kiln after firing. Many of the pots have tipped over (see top right and middle top and bottom).

Surface detail at the top of one pot. Pots lined with black glaze.
Untitled 2011 - glaze with glossy surface

Untitled 2011 - glaze with matt surface due to what I think are unmelted ash deposits